***This post is from several years ago and mysteriously ended up back as a draft. So, here it is again!***
I had no idea so many people made their own laundry detergent until I started posting about it on Facebook! Holy moly, there are a lot of recipes out there!!
A few weeks ago I made a recipe I found on Pinterest for something called
Laundry Sauce. I like it because it seemed different from other recipes I'd seen. It looked more professional....or something like that. So, I made my first attempt, and it was just okay. I blogged about it
here. The Laundry Sauce was kind of gritty, and after reading a lot of the comments, I learned that I hadn't let all of the soap dissolve in the cooking process.
 |
| First attempt at Laundry Sauce |
Throughout this process, I also learned that my oh-so-handsome hubby used to make homemade laundry detergent. (I know.....I was surprised at this information, too.)
 |
| Isn't he HANDSOME?! |
Michael's laundry detergent was liquid, and was much less labor intensive than mine. Which left me wondering.......Which detergent is better? Which should I be using? Maybe I should just stick with good 'ole Tide.
So I decided to take this laundry soap thing up a notch and have a (drumroll please!)......
Laundry Soap CleanOff!!
(Yup, I really am that big of a dork.)
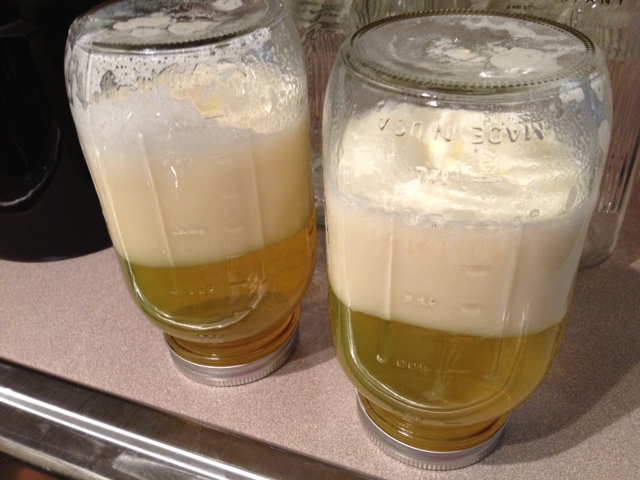
Liquid Laundry Detergent in the bucket and setting for 24 hours.
Liquid detergent finished! It's only kind of liquid....it's more like a gelatin. The big whole in the middle is from me using it for the CleanOff.
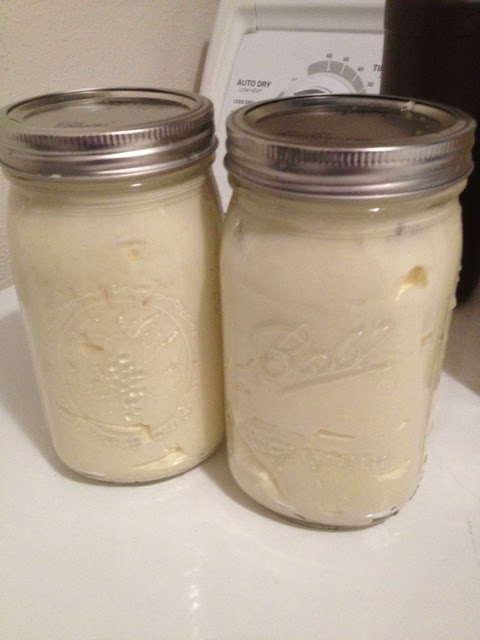
Laundry Sauce being made.....It turned out GREAT this time!!!
The bad batch is on the left...the good batch is on the right.
So, here's what happened last weekend. I took three socks that had lost their partners and labeled them.
L = liquid soap
S = laundry sauce
T = Tide
Then I buried them in the dirt and poured some water on them.
I washed them all with their assigned soap, and here are the results.
They all did pretty good, but in person, it's clear that the Laundry Sauce did the best!! Here's my disclaimer on that, though. The socks with the liquid detergent and the Tide sat longer than the one with the Laundry Sauce.
So, I've decided I'm just going to use all of the detergent I have (liquid and sauce) before I worry about making more. But when it's time to make more, I think Laundry Sauce is my winner!!!
Here are the recipes for both:
After reading this recipe again, I think maybe I should have stirred up my gelatin/liquid detergent. Oh, well! Live and learn!
Ingredients:
Borax
Super Washing Soda (not Baking Soda)
a Bar of Fels Naptha
Cheese Grater
5 Gallon bucket
Measuring cups
A Pot
Spoon with Holes (optional)
Funnel (optional)
Beverage Dispenser, Old Laundry Container, etc.
Directions:
1. Grate bar of Fels Naptha and add it to the pot.2. Add 1 quart (4 cups) of water to the pot, and melt the soap on low/medium heat.
3. Add melted soap mixture to the 5 gallon bucket.
4. Fill 5 gallon bucket with water halfway.
5. Add 2 cups of Borax to the 5 gallon bucket.6. Add 2 cups of Super Washing Soda to the 5 gallon bucket and stir the mixture thoroughly.7. Fill the 5 gallon bucket all the way with water leaving enough room for the lid so it doesn't spill over, and stir again.
8. Cover the bucket with the lid or with cling wrap and let it sit overnight (24 hours).
9. In the morning, stir the detergent some more, breaking up the gelatin clumps at the top (the fenestrated spoon helps with that).
10. Put in desired container.
Mom's Super Laundry Sauce
(You really need to check out this website and read all of the comments before making. Plus, the website has lots of GREAT step-by-step pictures. The whole process is definitely an ordeal.)
~ This makes 1/2 Gallon of concentrate ~
~ Btw, that's a full 128 loads of laundry!! ~
1 bar Fels Naptha
1 cup 20 Mule Team Borax
1 cup Arm & Hammer Washing Soda (NOT BAKING SODA!!)
4 cups of hot water
Quick Note: Follow the directions Carefully, adding the ingredients at the wrong time will result in a grainy textured detergent that will not dissolve well in the washer.
Step 1: Put 4 cups of water in a large heavy saucepan over high heat. While that is heating, mix the borax and washing soda together in a bowl, mixing well, set aside.
Step 2: Grate the Fels Naptha- the easiest way to do this is to cut it into several smaller chunks and then run it through a food processor- otherwise, you can just grate it with a hand grater or shave it with a knife.
Step 3: Add the freshly grated soap to the water in the saucepan, stirring almost constantly. Reduce the heat to medium, It will take approximately 10 – 15 minutes for the Fels Naptha to complete dissolve. If it takes longer, your heat wasn't up high enough. Alternatively, you can melt the fels on the stove over low heat without water then add the water afterwards, stirring it in, as the original recipe called for. I find that it's much easier to melt IN the water. Absolutely do NOT let this Boil over, or you'll have a sudsy mess that you do NOT want to contend with!! It should be a rolling, simmering boil where you must stir Constantly but it does not foam heavily or seem to "creep up" the saucepan. See the photo below- note the amount of "foam" - that's all you should see.
Step 4: Once the fels naptha has completely melted, remove the pan from the heat and add in the Borax and the Washing Soda, stirring constantly until the powders are completely dissolved, this will take about 3-5 minutes. Do not under-stir or your soap texture will be very grainy rather than smooth. (You can fee the "graininess" on the bottom of the pan, once you can't feel it, it's incorporated fully!)
Step 5: Pour the liquid equally into (2) 1 quart Mason jars.
Step 6: Add just enough water to bring the contents up to the “shoulders” or Rounded part of the jar, leaving approximately 1 ½ inches of headspace.
Step 7: Put the lid on the jars and turn them UPSIDE DOWN and let them sit a few hours (about 4 - 5 hours). The reason for this is that the soap is going to Separate into layers while it's resting and occasionally will form crystals on the bottom. Rather than waste these trying to scrape them off, in the next step we're going to incorporate them easily! Btw, if you leave it overnight it will have a slightly grainier texture than if you whip it immediately after 4 hours. The Layers will separate after a few hours. Then the bottom layer will become very, very thick.
Step 8: There are two ways to do this next step, depending on what you have for equipment. Here's how I like to do it- unscrew the blade and bottom from your blender and screw them onto your regular mouthed mason jar containing all of your ingredients. Place the entire mason jar on the blender and whip until smooth and creamy throughout, about a minute. Flip back over, unscrew the blender blade, attach a cover and seal.